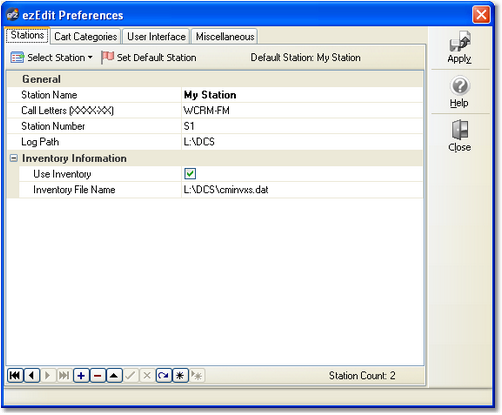
In this area, you define the various station logs you will be editing. Each station setup can be named something that's meaningful to you. You also identify the station's call letters, log path and inventory file.
Maintaining Stations
Add a Station. To add a station to the Configured Stations list, click on the "+" button on the navigation toolbar. A new station record will be created and you can fill in the fields with the appropriate information. To save your changes, click on the "Save Changes (Post Edit)" button, represented by a check mark.
|
Float your mouse over the navigation toolbar for hints on the use of each of the buttons. |

Edit a Station. To edit information, select the station to be edited by either clicking on the [Select Station] button to display the stations list, or use the navigation buttons to move among the stations.

Station selection list
Once you have selected the station you wish to edit, make appropriate changes and click on the "Save Changes (Post Edit)" button, represented by a check mark.
Delete a Station. To delete a station configuration, select the station you wish to delete by clicking on the station name in the station list, or use the navigation buttons to move among the stations. Once you have selected the station you wish to delete, click on the "Delete Record" ( - ) button on the navigation toolbar. After confirming you wish to delete, the station information will be deleted.
|
Deleting a station definition removes all information about that station. If you didn't mean to delete the station, you must close the Preferences dialog and choose not to save the changes. When you re-open Preferences, the Configured Stations list is restored to its last saved state. Be aware that not saving changes on exiting the Preferences dialog saves no changes you may have made while working in the Preferences dialog. |

Setting a Default Station
If desired, you can make one of the defined stations the "default station". If a default station is defined, it is the station initially displayed when opening a new log or log validation report.
To set the default station, select a station and click on the [Set Default Station] button to make it the default station.
Station Setup Field Details
Items with a check mark in the REQ column require user entry, while unchecked items have default values which can optionally be changed. Items marked ?? are conditionally required, depending on other station settings.
Field |
REQ |
Usage |
||
|---|---|---|---|---|
Station Name |
|
Identifies the station you're configuring and is used within ezEdit only. It appears on station selection lists and other places in ezEdit where the station name helps identify what log you are working with. The name entered here should be unique so as to easily distinguish among station records. |
||
Call Letters |
|
The call letters of this station. The information is placed in the log file. Maestro and DCS use this information to display station call letters. |
||
Station Number |
|
The assigned station number (in DCS, Maestro or XStudio) for this station. Typically, it would be in a range of 1..9. The station number can be a one or two-character entry. |
||
Log Path |
|
The storage location (drive, folder) of logs for a station. UNC paths can be used, if desired, but may slow performance.
|
||
Use Inventory |
|
Check this item if you wish to use an XStudio, DCS, or Maestro inventory list when editing logs for this station. An inventory is also required for log validation reports. |
||
Inventory File |
?? |
If you have checked the "Use Inventory" item, then you must select a valid inventory for this station. If the "Use Inventory" item is not checked, then you do not need an entry for this field. You can use the ellipse button adjacent to the field to browse for the inventory file you wish to use. |

Importing and Exporting Station information
You may wish to save your station information for use with another ezEdit system or for archival purposes. ezEdit provides the means to export and import station information via the Stations context menu. [Right-Click] anywhere on the Stations page to invoke the context menu.
To export information, select the Export Station Info menu item. You'll be prompted to select a file name for exported information.
To import information, select the Import Station Info menu item. You'll be prompted to select the file containing the station information. If you already have some stations defined in ezEdit, you have the option to replace them with the imported information or to append the imported information to the existing station information.
|
No duplicate checking is done when importing station information into existing station information using the option to append station records. You should check for duplicates when the import process has completed and remove any duplicates. You should also check your default station setting, particularly if you replace existing station information with imported information. |

As a default, ezEdit uses the file extension .stns when exporting or importing station information. The information is stored in an ini file structure.