dcsTools Audio Importer requires a valid registration license file to enable full use of the product. If you have purchased dcsTools Audio Importer, you should have received instructions on how to obtain your registration license file with your installation materials. The license file is unique to each PC on which dcsTools Audio Importer is installed. Depending on whether or not you have additional encoding options installed, you may need to register those options as well.
Preparing to Register
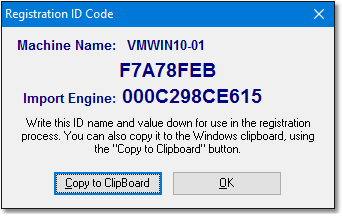
In order to register dcsTools Audio Importer, you need to supply your vendor with information unique to the PC on which the software is installed. From the dcsTools Audio Import Manager main display, select the menu item Help | Get Machine ID for Registration. A dialog is displayed, containing the ID’s necessary to register the software.
You will need to either write down the machine name, ID and Import Engine ID or you can use the [Copy to Clipboard] button to copy this information to the Windows clipboard. If you use the clipboard method, you can paste the information into an email or a Notepad text document using the [Ctrl‑V] keystroke.
|
All three (3) pieces of information are required to register dcsTools Audio Importer – the machine name, the application ID and the Import Engine ID. If you also purchased the apt-X encoding option, a separate registration is required. |
dcsTools Audio Importer Registration
Registering the audio import engine requires a license file that is supplied to you by your vendor. The license file is created using the information you provided from the dcsTools Audio Importer Registration ID Code dialog. When you receive the license file, copy it to the folder in which dcsTools Audio Importer is installed, overwriting any existing file of the same name. The license file can be copied while the import engine is running. The audio import engine will automatically detect the new license file.
apt-X Encoder Registration (Optional Product)
If you have the apt-X encoder software installed with a product, you must register this software module separately. The encoder software is machine-specific. This software can only be registered after it is installed on the PC.
When first installed and not yet registered, the apt-X encoder normally will pop up a trial run dialog when the host application is run. However, when the encoding software is being used by a Windows service application, you will not see the registration dialog because service applications and their display windows are hidden from the desktop.
In order to view the apt-X registration dialog, retrieve the needed information to register the software and, when you have received the registration, complete the registration process, you need to use a utility application supplied with dcsTools Audio Import Manager.
Soft apt-X™ Registration Step-by-Step (Service Application)
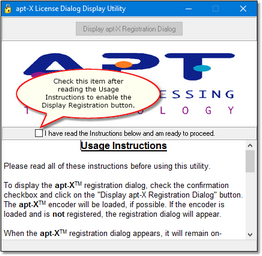
1.Launch the apt-X License Dialog Display Utility. A menu item is usually created to access this utility. It can be found in the Programs (or All Programs) menu under dcsTools Audio Importer | Registration Utility - apt-X. If you cannot locate a menu item, use Windows Explorer to find the file aptX_RegDlg.exe, which will be located in the folder where the software was installed.
When started, the utility's main display appears, similar to the example shown.
2.Read the on-screen instructions and click on the check box confirming that you have read the instructions are ready to continue. The [Display apt-X Registration Dialog] button will be enabled.
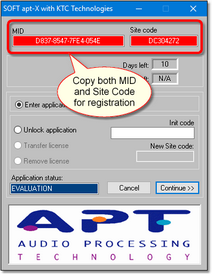
3.Click on the [Display apt-X Registration Dialog] button to display the apt-X registration dialog, which will appear similar to the example shown. If the apt-X registration dialog not appear, refer to the section on apt-X Registration Troubleshooting below.
|
The apt-X registration dialog normally closes after several seconds if no action is taken by the user. To keep the dialog from closing while you copy down the needed information, select the "Unlock Application" radio button, which prevents the dialog from closing. |
4.Select the “Unlock Application” radio button when the apt-X registration dialog is displayed. This stops the dialog from disappearing after a few seconds, giving you the time to write down both the MID Code and the Site Code, which appear across the top of the display. You can use a mouse to select and copy each of the two codes to the Windows clipboard, if you wish, to avoid handwriting the information.
5.When you have written down both codes, select the “Enter Application” radio button and click on the [Continue] button, which closes the apt-X registration dialog.
6.Close the apt-X License Dialog Display Utility.
7.E-mail the Mid Code and Site Code information you’ve written down to your supplier, or alternatively, use our on-line product-specific contact form. To better identify your request, write “Soft apt-X Registration” in the Subject line of your e-mail.
8.You will receive by return e-mail the necessary Init Code to register the apt-X software. You will also receive a Remove Code, which may be needed at a later time. Be sure to keep both of these codes for future use.
9.When you receive the Init Code, launch the apt-X License Dialog Display Utility. Click on the check box confirming that you have read the instructions are ready to continue. The [Display apt-X Registration Dialog] button will be enabled. Click on the [Display apt-X Registration Dialog] button to display the apt-X registration dialog. Select the “Unlock Application” radio button and enter the Init Code you received. Click on the [Continue] button. The registration information is recorded and the apt-X software is now registered.
|
If you decide to move the software that uses apt-X and the apt-X encoder software to another machine or substantial changes occur on the PC running with the apt-X software, the apt-X registration will have to transferred or updated. In order to do so, you will need the Remove Code. Be sure you have saved both the Init Code and the Remove Code in a safe place! |
apt-X Registration Troubleshooting (Service Application)
When the apt-X encoding software is being used by a Windows service application, normal display of the apt-X registration dialog is not possible, so a utility application is used to display the dialog.
The most common problem is that the apt-X registration dialog does not display when you click on the [Display apt-X Registration Dialog] button of the apt-X License Dialog Display Utility.
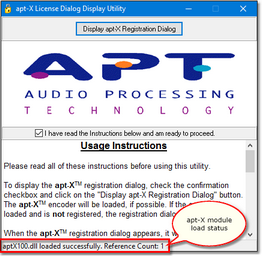
Check the status bar of the apt-X License Dialog Display Utility. It will tell you whether or not the apt-X module was successfully loaded.
If the status bar indicates the apt-X module was not loaded, then either the module is missing altogether or the module is not in the system path. Search your hard disk for the file aptx100.dll to see if it exists.
If the status bar indicates the apt-X module was successfully loaded, but the apt-X registration dialog does not display, then the problem is likely to be that the software is already licensed. When the apt-X module is already registered, the registration dialog does not display.


