When a log has been selected and opened, the main display will appear similar to the example shown here. There are three main areas in this display: a) hourly audio content totals; b) the log; and c) inventory display. There is a tool bar (similar to the one shown) that provides button access to commonly-used functions. To determine a button's use, float your mouse over it for a hint.
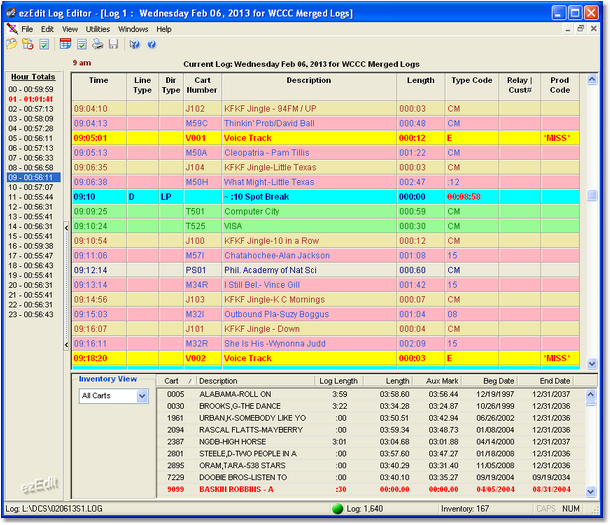
The log display table is where most of your work will be done. There are a number of basic actions that you will perform, including inserting an item, editing an item and deleting an item.
Inserting a Log Item
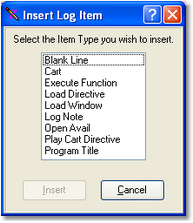
Inserting a log item places the new item immediately in front of (ahead of) the current selected log item. To insert an item, touch the [Ins] key. Alternatively, you can [Right-Click] and select the menu item Add Log Item or select Edit | Add Log Item from the main menu. In all cases, an insert dialog is displayed, allowing you to choose the type of item to insert.
|
If you are positioned on the last item on the log, you'll be prompted to either insert an item or append an item. Appending will place the new item at the end of the log after the current, selected item. |

Select the type of item you want and either press the [Enter] key or click on the [OK] button. An edit dialog customized for the particular type of item you're inserting will be displayed. For more information on each of the edit display types, see the section on Working with Edit Dialogs.
Fill in the appropriate fields in the insert dialog and click on [OK] to complete the insertion. Your data entry will be validated and you'll be prompted if you have missing information or incorrect information.
Editing a Log Item
To edit, press the [F3] key. You can also [Double-Click] on the item or select Edit Log Item from the main menu or the log's pop-up menu. An edit dialog will appear, customized for the type of item you are editing.
Change the appropriate fields and click on [OK] to complete the edit. Your edits will be validated and you'll be prompted if you have missing information or incorrect information.
|
When editing Log Notes, Blank Lines, Directives and Program Titles, the Log Time of the item must fall between the previous non-spot time and the next non-spot time on the log. |

Moving a Log Item
Audio items (carts), can be moved from one location to another on the log by dragging and dropping the item. [Left-Click] and hold the mouse button down on an audio item, then move the mouse pointer to the location where you wish to place the item and release the mouse button. The item will be moved from its original location to the new location. If, during the drag process, you drag above the top visible item or bottom visible item on the log, the log will "scroll" in the appropriate direction. Moving the mouse back into the visible items area of the log will stop the scrolling and you can then drop the item to its new location. If you decide not to drop the item, meaning you want to cancel the move, drag the item completely out of the visible items area of the log and release the mouse button. The item will not be moved.
|
ezEdit allows ONLY audio items to be moved. All other non-audio items (program titles, directives, etc.) must either be edited to change the item time or deleted and re-inserted at the appropriate time. |
Deleting a Log Item
To delete an item, press the [Del] key or select Delete Log Item from either the main menu or pop-up menu. You'll be asked to confirm that you really want to delete the item. If you answer "Yes", the item is deleted from the log. Answering "No" cancels the deletion.
|
Adding, editing, deleting and moving carts around on the log do not affect the original log on hard disk. The changes you've made take effect only when you save the log. If you should get to the point where you do not want to keep your edits and would rather start over, simply open the log from disk again. You'll be asked whether or not to save your changes - in this case, you'd answer "No" and retrieve the original log from disk. |

Finding the Next Open Avail
Press the [F8] key to jump to the next open avail - the next available position on the log to insert an audio item (cart). Pressing the [Shift-F8] keys will jump to the previous open avail.
Jumping to the Next Directive
Press the [F4] key to jump to the next directive item on the log. Pressing the [Shift-F4] keys will jump to the previous directive.
Searching the Log
Press the [F11] key to display a log search dialog. You can search for a cart number or search the description. Once a search has been performed, you can search again by pressing the [F12] key. The search again will start from the last successful search position on the log, enabling you to search the entire log by repeatedly pressing the [F12] key. The log search features can also be accessed from the Edit menu. The search mechanism will find the search text you've entered anywhere in the cart number or description. For instance, you could search for "john" in the description field and "Elton John", "Rob Johnson" and "John-Boy" will be found. The same is true of searching cart numbers, although if you enter a 4-digit cart number, the match will have to be exact as there are only 4 digits in the cart number. For additional information, see the topic Searching a Log.
Hourly Totals (Jump to Time)
The left side of the main display lists the 24 hours in a log, along with the scheduled audio content length for each hour. If an inventory is used with a given station, the hourly totals will be based on the inventory, using the Aux Mark time of each cart on the log. If a cart does not exist in the inventory, the log length value is used in the total. If no inventory is used, hourly totals are calculated entirely on the log length values of the carts on the log.
The size of the text that displays the hour number and the total for the hour can be increased or decreased for readability by using a pop-up menu. [Right-Click] on the Hour Totals list and either increase or decrease the font size of the text.
|
You can use the "splitter bar" between the Hourly Totals list and the log display to widen the list so you can see the entire line of text if you increase the text size. |
The hourly totals list also serves as a method of jumping to a particular hour on the log. [Double-Click] on any one of the hours to jump to the beginning of the selected hour on the log. Selecting an hour and pressing the [Enter] key can also be used to jump to the selected hour.
|
You can jump to a specific time on the log by pressing the [F2] key. You'll be prompted for the time to jump to. See the reference section on Keyboard Shortcuts for a complete list of keyboard shortcuts you can use. |
Inventory
The bottom-right section of the main log editing window is the inventory list, if used. You can sort, filter and place carts from the inventory on the log (using drag and drop operations). For more details, see the section on Using the Inventory.
|
You can increase or decrease the size of the inventory display (it affects the log display, too) by dragging the "splitter bar" located between the log display and the inventory display. Float your mouse over the display until you see the standard resize cursor, then [Left-Click] and drag the splitter up or down to get the size you want. ezEdit "remembers" this setting next time you start the program. |