Log validation checks the items on a log to see if they exist in the inventory of the XStudio , DCS, or Maestro machine on which the log will be aired, and checks whether or not the item is valid for the log date. A report is generated that can be printed or saved to file.
You can validate logs that are either on disk or currently being edited in an ezEdit edit window. Validating a log that's already in an edit window is a bit faster in that the log and inventory are already present and do not have to be loaded from disk.
To validate a log, select the appropriate menu item or tool bar button, depending on whether you wish to validate a log you're currently working with or a completely different log. In the case you wish to validate a log from disk, a dialog is presented, allowing you to select the station and log to be validated. Then, a window similar to the one shown here is displayed. A gauge shows the progress of validation until complete.
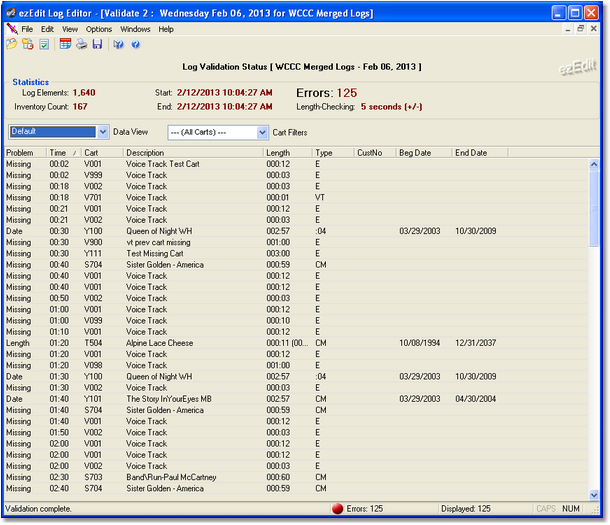
When the validation process is complete, you can scroll the bottom portion of the display to see individual items that have failed validation and why. The top portion of the display shows statistics about the log, inventory and number of validation errors.
Display Columns
Validation reports are displayed in a columnar format.
|
Report columns can be moved and re-sized as desired for each data view. The columns' location and size information are saved when the report window is closed and restored the next time a report window is opened. |

Here's a brief description of the information displayed, by column:
Column Name |
Description |
|---|---|
Problem |
The specific problem with validating the log item. Problems commonly include the cart's run dates not being valid for the log date, the log item is missing from the audio delivery system inventory, or the logged length of the item and its actual length do not match (if Length-Checking enabled). |
Time |
The scheduled log time. |
Cart No |
The number of the cart (audio file) played. |
Description |
Log description of the item. |
Length |
The playback length of a cart, expressed as minutes, seconds and hundredths of a second. |
Type |
The item's Type Code, also known as Commercial Type. |
Cust No (Customer Number) |
The customer number associated with the cart, if originally present on the broadcast log created by the traffic system. |
Begin Date |
If available, the begin date of the audio item. The date is retrieved from the audio delivery system's inventory. |
End Date |
If available, the end date of the audio item. The date is retrieved from the audio delivery system's inventory. |
Cart Length-Checking
Validation can include cart length-checking. This feature is enabled or disabled from the Options menu. Select the Cart Length Check item and then set the +/- range, in seconds, to use. When length-checking is enabled, the validation process first checks the cart's date to ensure it's valid for the log date. Then, the logged length (from the log) is compared against the inventory's reported actual cart length (to AUX mark). If the actual length does not fall within the range of the logged length plus or minus the selected number of seconds, it is reported as having a length problem and will appear in the list of problems. If you change the number of seconds to evaluate, you're prompted to re-validate the log, which will now use the new value to determine if a cart meets the length requirements.
Filtering the Report
You can use the displayed Cart Mask combo box to select a cart filter to use. Cart filters are set up in Preferences and are global to both inventory filtering and validation report filtering. See the section in Preferences on Cart Filters for more information on creating cart filters. The effect of using cart filters is to include only cart numbers that match a given filter set, thus reducing the displayed validation errors to just those a particular user might want to see or take action on. For instance, the traffic department might be interested only in commercials that don't validate, not music or jingles or promos.
Sorting the Report
You can change the sort order of the items list - just click on the column name that you wish to use for sorting. Clicking once on a column sorts ascending; clicking a second time sorts descending.
Report Views
You can select different "views" of the data, which changes the display layout and affects which data is displayed. You can choose to display only date problems, only length problems, only missing carts or group data by problem type or cart number.
Printing the Validation Report
To print the validation information, click on the [Print] button on the tool bar or select the menu item File | Print Validation Report. A print dialog will be displayed, allowing you to select the printer, choose portrait or landscape mode, choose to print only selected items on the report, or cancel the print operation. The printed report may span more than one page, depending on the number of items that failed validation. The report columns will fit on a standard page in portrait mode, which is the default.
|
To print only a selected number of items, you can select multiple items in the display using the standard Windows methods for multiple item selection. Then, when printing, check the "Print Only Selected Items" checkbox. You can use this feature to print only one instance of a non-validated item rather than all 10 times the item appeared on the log. |
Saving Validation Report Info to a File
You can save the validation information to a standard text file that can be opened in any text editor or word processor. Click on the [Save] button, or select File | Save Validation Report, and you'll be prompted to enter a file name and choose a location for saving.
|
You can [Right-Click] on the items display to pop up a menu that also provides the print and save features. |