If you have defined an external inventory for a station or are using the default Generate and Use Local Inventory setting in Preferences, XStudio will display available inventory information. The inventory list can be used for adding items to the log, adding items to the audio clipboard, and to edit selected cart properties.
The inventory information can be sorted and/or filtered for ease of use. The same type of display is also used for cart selection when adding or editing a spot record or adding or editing a play cart directive. The inventory display will look similar to the following:
Expired carts, those that are invalid for today's date, are displayed in red and future-dated carts, those that are valid from some date range beyond today, are displayed in green.
Selecting Carts from the Inventory
You can use the inventory to insert carts on the log (on the main display) and to select carts when adding or editing a spot record or play cart directive. The selection process is slightly different, depending on whether you are working on the main display with a log or editing a single cart item in one of the pop-up dialogs.
Main Display - Inserting a Cart from the Inventory into the Log
On the main display, you can select a cart from the inventory and place it on the log. [Left-Click] on the cart, hold the mouse button down and drag the cart to the position on the log where you want to insert the cart. Then, drop it on the log. If the cart is invalid for the selected log date, you'll be prompted and offered the opportunity to cancel adding the cart to the log.
Selecting a Cart in an Edit Dialog
To select a cart in one of the edit dialogs, [Double-Click] on the cart you wish to select, or, if you prefer using the keyboard, highlight the cart and press the [Enter] key. In either case, the cart number, description and length of the cart will be placed in the edit fields. You can also drag a cart from the inventory and drop it on the record display, similar to the main display drag and drop operation.
Filtering Carts
The left portion of the display is for "filtering" the inventory list. There are predefined filters for all carts, expired carts and future-dated carts. Additionally, you can create your own filters in Preferences. The use of cart filters reduces the size of the list to only those items you wish to see. You can change the filter or, if you have the User Filters view selected, change the Cart Filter at any time.
Sorting Carts
You can sort the inventory by clicking on the column header on which you wish to sort. Most, but not all, columns can be used for sorting. Clicking once on the column sorts in ascending order on the column; clicking again reverses the sort to descending order.
|
The following items are available on the main display only! None of the log record edit dialogs that include an inventory list have these options available. |
The XStudio Inventory Pop-Up Menu
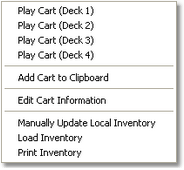
The XStudio inventory pop-up menu provides some options related to the inventory display. To access the menu, [Right-Click] on the displayed inventory list.

XStudio Inventory Pop-Up Menu
There are a number of options available on the inventory pop-up menu. Certain menu items are enabled or disabled, depending on whether you have a cart selected in the list.
Play Cart (Channel 1, 2, 3, 4)
If you have a cart (audio item) selected when you access the inventory pop-up menu, you can immediately play the selected cart to a particular channel (deck) by selecting the menu item for the channel on which you wish to play the cart. If the selected cart is missing or out-of-date (and Enforce Cart Dates is enabled), an advisory message is displayed.
Add Cart to Clipboard
Select this menu item to place the selected cart in the audio clipboard. The item will be appended to the list of items, if any, and appear at the bottom of the list.
Edit Cart Information
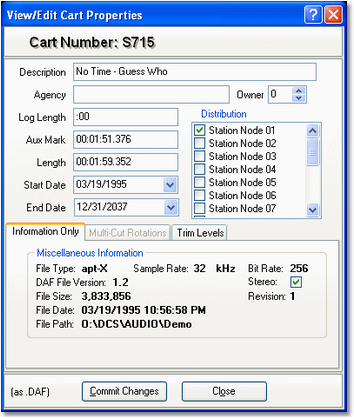
XStudio allows you to edit selected cart properties when you select this menu item. An edit dialog appears, similar to the one shown.
You can edit the cart description, agency field, log length, start date, end date, AUX Mark, audio length (shorten only), distribution and gain trim.
|
Items that can be edited vary by the type of cart you are editing. Not all items are available for all types of carts. |
Once you have completed your edits, click on the [Commit] button to save the changes. XStudio saves the revisions, which take effect immediately.
Manually Update Local Inventory
Selecting this menu item forces XStudio to re-scan the audio folder and rebuild the list of available inventory immediately. Normally, XStudio will periodically check the audio folder for changes and rebuild the inventory automatically. If the audio folder is a local drive, detection of changes to the inventory on-disk is virtually immediate. On a network drive, the check is made at regular intervals that are user-definable. This menu option allows you to update the inventory on-demand and is particularly useful when the audio folder is a network drive and you have the Scan Interval set to a high value.
Load Inventory
This menu option allows you to load and display an inventory file of your choosing. You are prompted to select a file name.
Printing a Cart List
You can print a list of carts at any time. [Right-Click] on the inventory display and select the menu item Print Inventory from the pop-up menu. You're offered the chance to select a printer, print the list or cancel printing. The printed list will be as the inventory is displayed on-screen - that is, the printed list reflects the current filter and current sorting of the inventory.


