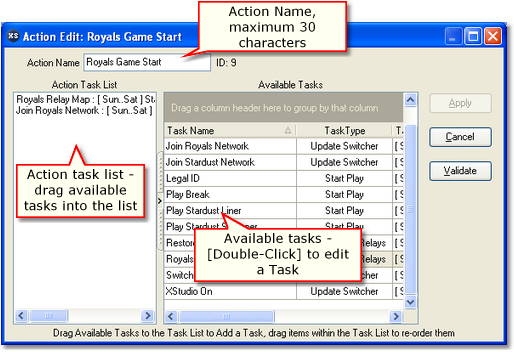
Creating new Actions and editing an Action are performed with the Action edit dialog, shown here. Using this dialog, you can rename the Action to be more meaningful; add, remove and reorder Tasks that are a part of the Action task list; and add or edit Tasks that you might wish to include in the Action.

Action Edit Dialog
Action Edit Dialog Properties
Items with a check mark in the REQ column require user entry, while unchecked items have default values which can optionally be changed.
Property |
REQ |
Description |
|---|---|---|
Action ID |
|
A unique ID number is automatically generated for each new Action. The ID number is in a range of 1 to ~4 billion and auto-generation starts at 1 and counts up. When editing a Action, the Action ID is displayed for reference. When creating a new Action, the Action ID is not displayed as it is not assigned until the Action is saved using the [Apply] button. |
Action Name |
|
The user-friendly name of the Action. Maximum length is 30 characters. |
Action Task List |
|
The Action task list is as implied - an ordered list of Tasks to be performed as a part of the Action. Task properties related to operating mode, day of week and time of day control whether or not a specific task is actually executed at Action run-time. |
Adding Tasks to the Action Task List
To add a Task to the Action task list, select the Task from the table of available tasks. Hold the [Left] mouse button down and drag the Task into task list box, then drop it (release the [Left] mouse button). When dragging the item, you can determine its position in the list by hovering the mouse in the exact position you want the Task before releasing the mouse button to drop it.
Moving a Task within the Action Task List
To move a Task up or down in the list, select the item you wish to move, hold down the [Left] mouse button, drag the item to its new position and release the mouse button.
Deleting a Task from the Action Task List
To delete a Task from the Action task list, select the item and either; 1) Press the [Delete] key; or 2) [Right-Click] and select the Delete Item from List menu option.

Action Task List Context Menu
Editing a Task in the Action Edit Dialog
Tasks can be edited while working in the Action Edit dialog. [Double-Click] on the Task you wish to edit to display the selected task's properties edit dialog. Make the desired changes and click on the task properties [Apply] button to save the changes.
|
Keep in mind that Tasks are global in nature and may be used in other Actions. Any changes you make to a Task will also be in effect when other Actions using the task are executed. |
Adding a New Task in the Action Edit Dialog
If you find yourself in need of a new Task when editing an Action, [Right-Click] on any Task in the Available Tasks table. Select the Create New Task menu item from the menu, as shown.

Available Tasks Context Menu
Create the new task as normal. After saving the Task, it will be available for selection and use in the Action Task List.

