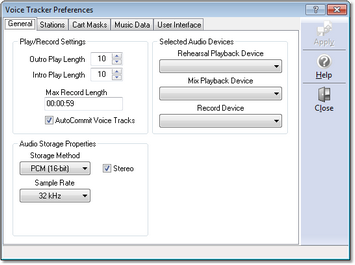
To edit preferences, select Edit | Preferences from the main menu. The tabbed Preferences dialog appears, with the General tab active, as shown here:
The only settings you need be concerned about initially on this page are selection of the Rehearsal Playback device and Record Device channels. Select the audio channel device you wish to use for each, using the drop-down list of available audio channels.
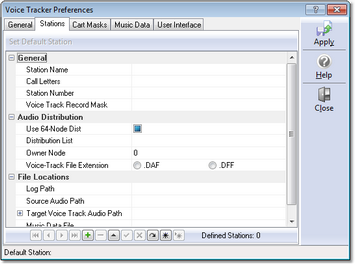
Select the Stations tab. We need to create information about one station for which we’ll be doing voice tracks. Initially, the display appears similar to this:
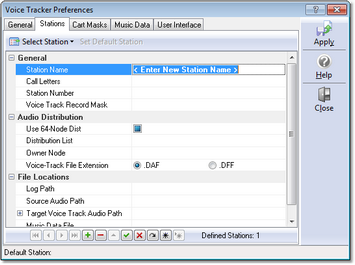
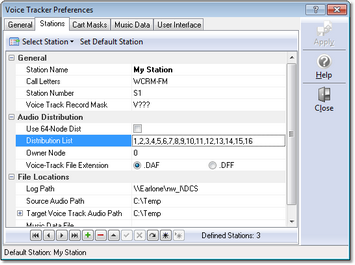
Click on the data navigator [+] (Insert) button to add a station. The display changes, similar to the example here:
Station Setup Step-by-Step:
1.Enter a name by which you’ll refer to this station and press the [Enter] key. The cursor advances to the Call Letters field.
2.Fill in the station Call Letters and press the [Enter] key.
3.The station number is the two-character value used in the log file name to identify the station log – i.e. “S1” – this value must be two (2) characters in length.
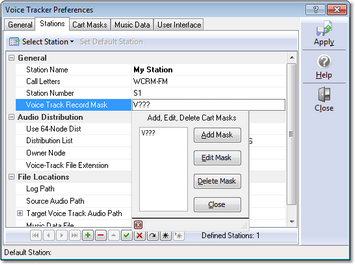
4.Press the [Enter] key – this time, a panel pops up, allowing you to create cart masks that identify for this station the carts that are voice tracks. A typical voice track mask is “V???”, shown as an example.
|
You can use more than one cart mask to identify voice track carts, but there must be at least one. When you are finished with the voice track cart masks, click on the [Close] button on the panel and move to the next item. |
5.The “Use 64-Node Dist” should be checked if you are distributing carts among more than 16 work stations.
6.When you enter the Distribution List field, a panel pops up, allowing you to select the work stations (nodes) that the voice track carts you create will be distributed to. Select the work stations that are to receive voice track carts for this station – there must be at least one station in the list that is checked for distribution. For ease in identifying stations in the distribution list, you can [Double-Click] on any station and edit the description – i.e. “Production Room 1”. When you have the desired distribution, used the [Close] button to hide the panel.
7.The Owner Node field is used to identify the work station that “owns” the voice track carts you create – it is applicable to sites that do not have either a Maestro or DCS system with ACP (Audio Central Plus) or XStudio as the delivery system. The default value is zero (0) – if you have an ACP system or are using XStudio, you can leave this value at the default.
8.The Voice-Track File Extension field is used to determine how recorded voice tracks are finalized. If the target system at the station you are voice tracking for is an ACP system and you’ll be putting finished voice track carts directly into the ACP audio folders, select the .DFF option – otherwise, the default .DAF option is fine.
9.The Log Path field identifies the location of log files for this station. You must either enter a path or use the button adjacent to the text area to select a path from a pop-up dialog. XStudio Voice Tracker will look in this folder for logs when voice tracking for this station.
10.The Source Audio Path is the location where your music files (for rehearsal) are located. Like the Log Path field, you can either enter the path or select it from a pop-up dialog. If you are working remote from the station, it’s likely the music audio is located on the local PC, if you’re working within a station facility, more than likely the music files are located on a server. In either case, you must have at least file read privileges in the selected folder.
11.The Target Voice Track Audio Path is the folder where you want voice track carts that you’ve recorded to be placed. This folder can be the same location as the Source Audio Path if desired – and normally would be if you’re using XStudio Voice Tracker in a station complex. On the other hand, if you’re working remotely, it would be desirable to place the voice track carts in a different folder – mainly for ease in getting them from your location to the station site.
12.The Music Data File field is optional and we’ll not use it for this example. In short, if a music data file is defined, when logs for the station are loaded, song title and artist information appears on the log.
When you have finished editing the station information, click on the [Post Edit] button on the navigator bar:

Post Changes button
It’s the one with a check mark as the graphic – you can float your mouse over the buttons for hints on their use.
Now that a station has been defined, you can save your settings and start voice tracking – but to make things visually easier to work with, you may wish to define some general cart masks and associate log colors with them. If you’d rather just get going on voice tracking, jump ahead to Step 3 – Voice Tracking!
Cart Filters and Log Colors
To create cart filters, select the Cart Filters tab.
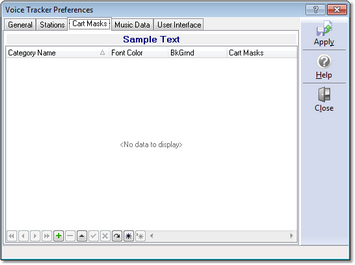
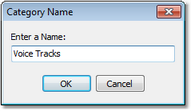
Initially, there are no Cart Filters defined. To create one, either click on the [+] button on the navigator or touch the [Insert] key. A dialog asking you to provide a name for the new filter is displayed.
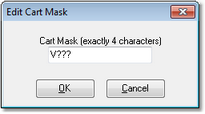
We’ve named this initial filter “Voice Tracks” – so we’ll be able to pick out voice track carts on the log more easily. Click [OK] after typing in the name you’ve chosen and a second dialog appears, asking you to enter the first cart mask that will be used with this filter.
Cart masks consist of 4 characters and may include a wild-card in any position. The wild-card character is the question mark (?) character. Here, you can see we’ve indicated that audio files (carts) beginning with the letter “V” and containing any combination of 2nd, 3rd, and 4th characters will be included in the filtered list.
You can create as many cart masks for a filter as you need. There is no real limit to the number of Cart Filters you might create, either.
Now, you can set the background and text colors that will be used for the carts when displayed on the log – notice there’s a sample text area right above the cart mask table that shows you what the background and text color combination will look like.
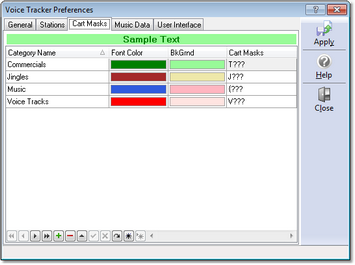
Here’s a sample of what a typical cart mask list might look like after creating color combinations for voice tracks, music, jingles and commercials:
|
Be sure to save your preference settings when you are done – just click on the [Apply] button to save the settings. |
