Scanning for DAF Files |

  
|
There are a couple of ways to initiate a scan for .DAF files. One is to start a completely new scan and select the folders you wish to scan, a second is to re-use a previously saved list of folders.
In this topic |
|---|
To perform a new scan, click on the [DAF Scan] button, shown here highlighted.
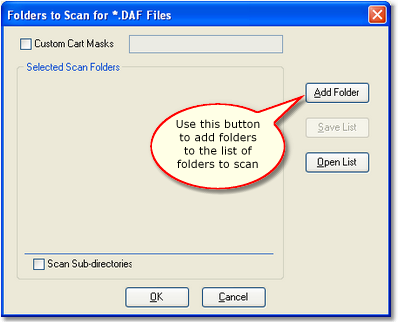
A folder selection dialog appears, allowing you to select folders to scan. Optionally, you can limit the results of your scan to just those carts (audio files) matching a cart mask (file mask) that you define. The folder selection dialog provides ways to save folder lists and open previously-saved folder lists. If you are creating a folder list that you might use again and again, be sure to save the list before closing the dialog.
Use the [Add Folder] button to add a folder to the list of folders that will be scanned.
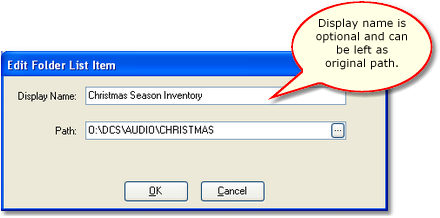
When you select a folder, the Edit Folder List Item dialog appears. It allows you to change the displayed name of the folder. Entering a description of the selected folder that is meaningful to you can be useful when you have several folders involved in a scan and may not remember the content of each folder. To leave the display name as the actual folder name, click on the [OK] button.
As folders are selected, the added folder's display name is shown in the Selected Scan Folders list. In the example shown, the first item in the list is displayed as the actual folder name, the second item is displayed with a user-entered display name.
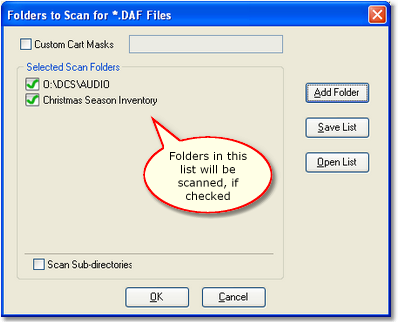
The folder item is checked, meaning that the folder will be scanned. You can "uncheck" the folder to skip scanning that particular folder.
To edit one of the folders in the list, press the [F2] key or [Double-Click] on the item. The Edit Folder List Item dialog appears, which allows you to modify the display name and if desired, change the actual path (folder) as well. You can use the button adjacent to the path information to select a different folder with a standard folder list. If you are using display names you have created, you can use the edit technique to view the actual path.
You can force iDAF to scan all subdirectories of selected folders if desired - just check the "Scan Sub-directories" item.
|
Be careful when using the Scan Sub-directories item, as you will get duplicate entries in your cart list if one of the folders you are scanning is also a subdirectory of another of the folders you are scanning. The subdirectory flag is applied to all selected folders in the list. |
You can limit the results of your scan to just certain audio files meeting your criteria. This might be useful in the case where you have a large number of audio files that would normally be scanned, but want to look at just a subset of them. If the subset will produce a much smaller number of files, the scanning process will complete more quickly than retrieving information on all audio files in a given folder.
To control which .DAF files for which complete information is retrieved, select folders to scan and whether or or subdirectories will be scanned, as usual. Check the "Custom Cart Masks" checkbox, which enables the adjacent mask entry field. Enter one or more cart masks, separating each mask from the others with a comma or semicolon.
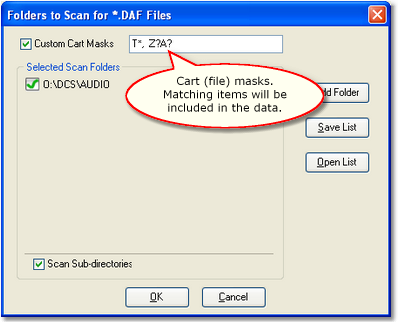
In the example shown, there are two masks entered, separated by a comma. The first mask (T*) means that all audio files with the first letter "T" will be included in the results. The second mask (Z?A?) is more specific, allowing only audio files with a first letter "Z" and third letter "A" to be included in the results. Note, too, that since the last character in the second mask is a question mark, only 4-character named audio files will be included - cuts of a multi-cut cart will not be included. To include cuts of a multi-cut cart in this example, change the mask to Z?A*.
|
The cart masks entered here are in reality file masks, and as such, you can use the normal operating system "*" (asterisk) and "?" (question mark) wildcards. In the context of performing a scan for audio files, the results are the same as if you used the Windows file search dialog. The main difference is that this dialog automatically adds the file extension (.DAF) to each mask in your list. If the carts (audio files) you're scanning might include multi-cut carts and you want them processed, you must use either an asterisk as the last character of the mask or use a 7-character mask that has question marks as the last four characters (to include the dash used in multi-cut cart file names), i.e: Z?A???? |
To start the scan for .DAF files, click on the [OK] button. The dialog will disappear and the scan will begin. The main display’s scan toolbar will change appearance, similar to the example shown in the Stopping a File Scan topic.
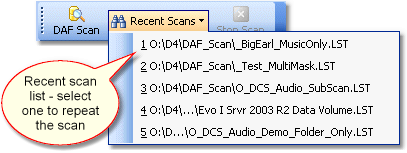
Once you have selected the folders you wish to scan, you can save the list you have created for re-use at another time. Click on the [Save List] button and provide a file name. The list will saved and can be later loaded in this dialog. The list also appears on the main display - select the button [Recent Scans] to drop down a list of the most recently used scan lists.
|
When you save a list of folders, any Custom Cart Masks are saved, as well as the state of the Scan Sub-directories checkbox and whether or not a particular folder in the list is enabled for scanning (checked). When you load the saved list, these additional properties are restored as well. |
To open a previously-saved scan list, click on the [Open List] button and select the list you previously saved. If you already have some folders in the list, you'll be prompted as to whether or not the list you're opening should be appended to what you already have in the list.
When you have saved a scan list prior to performing the scan, the list is automatically added to the [Recent Scans] button drop-down list. If you want to perform the scan again using the exact settings you saved, select the the list you want from the drop-down list. The scan will immediately be performed without presenting the selection dialog.
|
When you select a list from the [Recent Scans] button and drop-down list, any Custom Cart Masks that were saved with the folder list are used, along with the Scan Sub-directories flag and the enabled state of each of the folders in the list. |