You can display song title and artist information on the XStudio broadcast log if you either manually create or import the information into the music data table. As a log is loaded or refreshed, the music database is searched for matching cart numbers and if found, the song title and artist are added to the log record for display purposes.

Music Database Maintenance Display
You can manually create and edit song records, but it is by far easier to import the information and use the editing functionality in this area only when needed for a quick change or correction. There are utility functions available, including configuring automatic updates of the music data, to revise the artist and title information in bulk for appearance purposes, and to export music data from the table.
Importing Music Data
Importing song title and artist information is a two-step process. Because most music scheduling systems do not allow access to song data directly, you must first export the music library to a specially formatted file and then use that file when importing.
|
See the topic on Exporting Data from your Music Scheduling System for details on exporting song title and artist information from popular music scheduling systems. |

When you have a library file ready for import, click on the [Import Data] button to display the music system selection dialog, which is used to determine the type of music data file that will be imported.
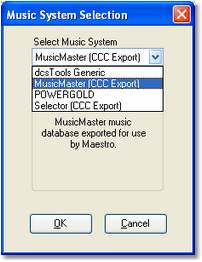
Choose the type of file you will be importing from the drop-down list of available types and click on the [OK] button.
|
If you exported your music database using the Generic dcsTools (XStudio) Export structure, select the menu item "MusicMaster (XStudio)" to import the data. |
You'll be prompted to select the file to import and the import process will begin. Should the Music Database already contain records, you will be prompted to choose whether you wish to append the imported records to the existing music records or simply replace all existing music records with the imported information. During the import process, a progress bar is displayed.

Music Import Progress Display
When the import is complete, the imported music data is displayed, ready to be reviewed. If errors occurred during the import process, a message will appear, offering the option of viewing details of the errors that occurred. You will also be prompted whether or not to use the import settings to enable auto-import of music data.
|
Some music databases may have some duplicate cart numbers. This occurs if cart numbers are erroneously assigned or sometimes where a cart number is reused when a song is taken out of the play rotation. Duplicate cart number handling is different when appending records to existing data versus the imported data replacing all existing music data. 1)Appending Records. If duplicate carts are found, each instance of the duplicate updates the music record. The effect is that the information of the last duplicate found in the source data becomes the content of the music record. 2)Inserting Records. If duplicate carts are found, only the first record encountered during the import is placed in the database. All others are discarded. |
Utility Functions
The [Utilities] button provides a dropdown menu containing utility functions for manipulating the music data. Many music directors have a habit of entering song information in their music scheduling system as all uppercase text. Others may be inconsistent in the way data is entered. Use the utilities to format the song title and artist fields either as proper-cased or all uppercase text.

Music Database Utilities Menu
Setup Music Auto-Update
When music is manually imported, you are presented with the option to enable auto-update of changed source music data. You can use this menu item to change auto-update settings, including enabling or disabling auto-update. For more information on auto-update of music data, see the topic Setup Auto-Update Music Data.
Proper-Case Music
Many times, the imported music information will have been entered in capital letters. For instance, a song title may appear as "THE WAY WE WERE" rather than the more visually attractive "The Way We Were". Select the Proper-Case Music menu item to update all music records. The first letter of each word in the song title and artist name fields will be capitalized and all other letters of the word in lower case.
|
The process is not perfect. There are a myriad number of possibilities in the proper case of artist names, for instance. The algorithm that determines capitalization of a word cannot consider all of the possibilities. It is intended as a starting point that will take care of the majority of the words. You should look through the music after running this utility to proof the results. |

Uppercase Music
As the name implies, when you select the menu item Convert Music to UPPERCASE, all song titles and artist names are updated so that all letters are upper-case.
Empty Music Database
Should the need arise, you can remove all music records in the database. Select the Empty Music Database menu item and after confirming your intent, all song title and artist information is removed from the database.
Export Music to dcsTools Format
Should the need arise, you can export the music data to a file for use with other dcsTools products that use song title and artist information. You are prompted for a file name and location. The exported file is a custom file type usable by other dcsTools applications. The export file contains the cart number, song title and artist information.
Export Music to CSV File
Selecting this menu option exports the music database information to a generic comma-separated values (CSV) format that can be used by many different software programs. During the export, you are prompted for a file name and location. When exporting to this format, only the cart number, song title and artist fields are written to the CSV file.
Add, Edit, Delete Music Records Manually
Edit a record. Any of the displayed music records can be edited. Click on the item you wish to edit, then click again or press the [F2] key to begin editing. When you have finished editing, click on the [Post] button in the data navigator.
Add a record. To add a new music record, press the [Insert] key or click on the Insert button in the data navigator. When you have filled in the cart number, title and artist information, click on the [Post] button in the data navigator. The Misc field is optional and is used during import to timestamp when the record was added or updated.
Delete a record. Select the music record you wish to delete and press the [Delete] key or click on the Delete button in the data navigator. You will be prompted to confirm the deletion.