Importing Music Information |

  
|
Importing Music Information |
|
To import your music database, you first need to export the music information from your music scheduling system. Supported music scheduling systems include Selector™, Music Master and POWERGOLD (others may be added in the future). If you are using Maestro and have already exported the music data for use within Maestro, you can use the same file. See the section on Exporting Data from your Music Scheduling System for more information on setting up and executing the export.
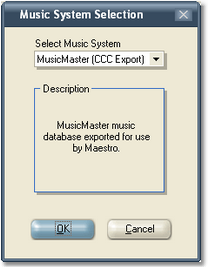
To import the music data you've exported from your music scheduling system, select the menu item File | Import. A dialog will be displayed for you to select the music system from which you will be importing.
|
On certain combinations of Windows 2000 and graphics cards, it has been observed that the import operation fails with an error when an import type is selected and the [OK] button pressed. If this happens, temporarily disable the application skinning (crWebBB main menu Options, uncheck the item Skinned Appearance) and run the import again. |
Next, a file dialog is displayed to select the data file you exported from your music scheduling system. Navigate to the folder where it's stored, select the file and click on the [OK] button. You will also be given the option to append (add) the imported music to the existing music records, if desired.
During the music import process, a status window appears, displaying the import progress. If some records cannot be imported or some other failure occurs, a message indicating the last error will appear. The import process can be quite lengthy, so be patient!
|
Some music databases may have some duplicate cart numbers. This occurs if cart numbers are erroneously assigned or sometimes, where a cart number is re-used when a song is taken out of the play rotation. Duplicate cart number handling is different when appending records to existing data versus the imported data replacing all existing music data.
You can find a record of duplicates after the import process has run and you've gotten a failure message. Select Help | View Database Log from the main menu. |
At the end of the import process, you will offered the option of enabling auto-update of the music data using the current settings. If you answer 'Yes" to the prompt, auto-update will be enabled and each time the source music data file is changed, crWebBB will automatically update the music table with the new music information. See the topic Setup Auto-Update Music Data for information on changing auto-update settings.
After the import is complete, you'll be able to see how many songs were imported by looking at the record display, which shows the total number of songs in the database.