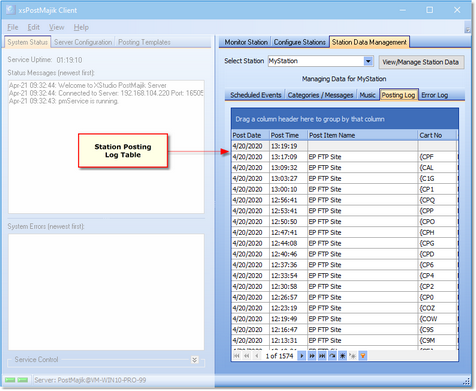
To review a station's posting log, select the Station Data Management tab page and then select the Posting Log tab within the page.
Ensure the XStudio PostMajik server (service) is running for maintenance, monitoring and configuration tasks. |
A station's posting log is a history of text items that have been posted for the station. No history is kept for RDS items. As a default, the table is sorted in newest to oldest order.
|
To make reviewing information easier, you may wish to re-size or maximize the PostMajik Client display in order to see more data at once. |
Station post log history is kept for 30 days as a default. The number of days of history that is retained is controlled by the system-wide Keep History setting, which can be modified to suit your needs.
Station posting records include the following information:
Field |
Description |
|---|---|
Post Date |
The date on which the item was posted. |
Post Time |
The time that the item was posted. |
Post Item Name |
The user-assigned name of the item posted. |
Cart No |
The cart number (audio ID) received from the host audio system. |
Category |
The cart category from which the post item contents were derived. |
Post Source |
The source of the post item contents. Typically, the source would be the music database or alternate message associated with the item's category. |
Post Status |
Status of the post, which indicates whether or not the item was posted successfully. |
Title |
For a music item, the song title. If the item is an alternate message, the text indicates this. |
Artist |
For a music item, the song's artist. If the item is an alternate message, this field contains the alternate message name (not the contents). |
Manipulating Displayed Post Log Data
To focus on just that information you are interested in, you can manipulate the displayed data in a number of ways. See the topic on Common Data Table Functionality for information on sorting, grouping and filtering the post log data.
Navigate the data using the built-in scroll bars, mouse wheel and the data table navigator.
Exporting Post Log Data
Displayed Post Log data can be exported in a number of formats for further review and analysis. To export, manipulate the data to display only records you are interested in using built-in sorting, grouping and filtering tools. Then, [Right-Click] on the data records to display the pop-up export menu.
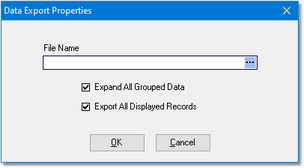
Select the export format. The export dialog appears, similar to the example shown here.
The Export Properties dialog settings and their descriptions include:
Property |
Description |
|---|---|
File Name |
Enter the fully-qualified name for the exported file. Use the ellipse button to display the file save dialog to make it easier to select the file location and name. The save dialog automatically sets the file extension for the selected export format. |
Expand All Grouped Data |
If you have have grouped data, checking this item (the default) expands all grouped records. If unchecked, the data is exported as displayed. |
Export All Displayed Records |
If checked (the default), all data is exported. If unchecked only records that are selected are exported. It is recommended you use filters to display only the data you wish to export and leave this item checked. |
Adjust the Export Properties settings to your preference and click on the [OK] button to complete the export.


