As it pertains to XStudio Voice Tracker, auto-tracking refers to the process of creating a voice-track cart (audio file) in rehearsed way. It’s easy to tell if you have Auto-Track enabled – the [Auto Track] button on the main display indicates the status. If it’s down, Auto-Track is enabled, if up, it’s disabled.

--- Auto-Track Enabled ---

--- Auto-Track Disabled ---
Auto-Track mode is toggled by clicking on the [Auto Track] button or using the [F9] shortcut key.
Start Auto-Track Sequence
To begin recording, make sure a voice track cart is selected on the log. Click on the [Record] button or use the [F4] shortcut key.

Outro Play
When Auto-Track mode is enabled, the voice-track recording sequence begins with playing last few seconds of the audio item preceding the voice track cart on the log.

Recording Auto-Start
When the Aux Mark of the playing audio is reached, the voice track cart recording starts automatically.
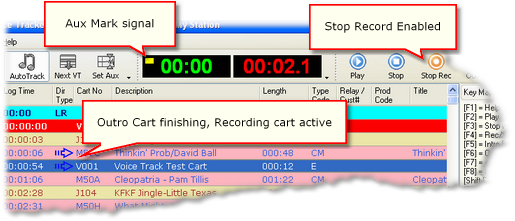
As soon as the Aux Mark indicator lights, recording is active and you can start talking. The recording time counter starts incrementing at record start and counts up in 1/10th second intervals.
|
Recording starts immediately – there is no waiting for first audio. This allows for delaying your voice work to some point beyond the Aux Mark when the audio is played back. Note: You can override this behavior by enabling the [Auto Rec] button. When enabled XStudio Voice Tracker will wait for first detected audio before actually beginning the recording. |

Set the Aux Mark
When you reach the point in your voice-track recording where you’d like the audio item immediately following the voice-track cart to start, click on the [Set Aux] button or use the [Space Bar] shortcut key. The next audio element on the log starts playing while the voice-track recording continues so you can talk up the ramp to vocal if needed.

Continue recording until you have completed your voice-over.
Stop Recording
When you have completed your voice-over, click on the [Stop Rec] button or use the [F4] shortcut key.
|
The [Record] button and [F4] shortcut key are toggled to stop recording, rather than start, when there is an active voice-track recording. |

Auditioning the Voice-Track
To listen to the voice-track sequence as it will appear on the air, ensure the voice-track cart is selected. Click on the [Play] button or use the [F2] shortcut key. With Auto-Track enabled, XStudio Voice Tracker will play the last few seconds of the audio item preceding the voice-track cart, segue into the voice-track cart playback, and segue into the item following the voice-track cart, providing a quick means of auditioning your sequence.
Do-Overs
If you are not happy with the voice-over, it’s easy to re-do it – just click on the [Record] button to start the Auto-Track sequence all over again. The original voice-track cart is overwritten with the new recording.
Tweaking the Voice-Track Aux Mark
You can revise a voice-track cart Aux Mark setting manually. [Double-Click] on the voice-track cart on the log, which opens a cart edit dialog. In the dialog, you can revise the Aux Mark, as well as a number of other properties, including start and end date.
|
The Start Date for a voice-track cart is automatically set to the log date and the End Date of the cart is automatically set to the log date plus one day. The End Date setting ensures that if a voice track scheduled on the log date needs to play after midnight of the following day due to over-scheduling of the log, it will play rather than being skipped due to date conflicts. |
Edit the Aux Mark and click on the [Commit] button to save the changes. You are returned to the main display and can immediately check the results of your edit by clicking on the [Play] button or by using the [F2] shortcut key.
For more detailed information on editing the Aux Mark and other voice-track cart properties, see the topic Editing Cart Properties.