|
Station Definition - Step-by-Step Station Name - Call Letters - Station Number - Voice Track Record Mask - 64-Node Distribution - Distribution List - Owner Node - Voice-Track File Extension - Log Path - Source Audio Path - Target Voice Track Audio Path - Voice Track Xfr Audio Path - Music Data File |
Scroll Prev Top Next More |
Defining a station that you will be using XStudio Voice Tracker do show preparation for is a fairly simple task, although there are a number of pieces of information needed. Here, we’ll walk through creation of a station definition, step-by-step. Many of the station properties you’ll be setting have custom pop-ups to assist in the task – where applicable, examples of what those pop-ups look like and how they are used are included.
To define a new station for voice-tracking – or to edit an existing station – you must first enter open the Preferences dialog and select the Stations tab. From the main screen’s menu, select Edit | Preferences and click on the tab named "Stations". For this step-by-step description, we’ll assume no stations have yet been defined.
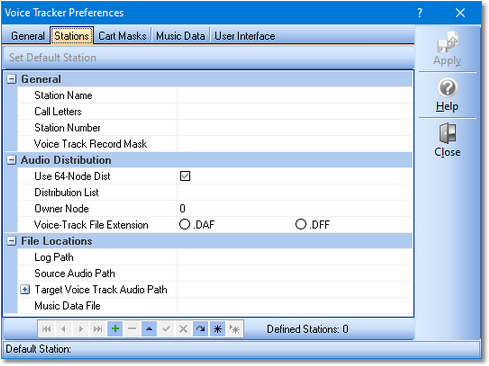
Initially, the Stations page looks similar to the example shown here:
Near the bottom of the page is a "navigator bar" that is used for adding, editing and deleting stations, among other things. For more information on the data navigators used in XStudio Voice Tracker, refer to the Data Navigators topic.
Step 1 – Add a new Station

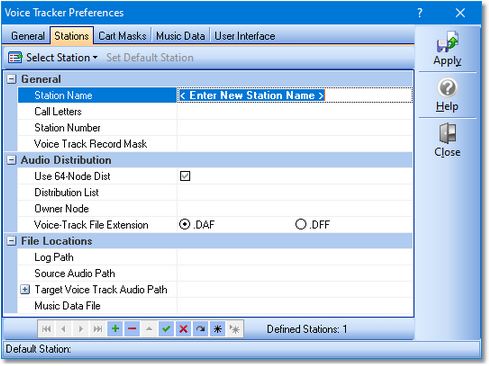
Using the navigator, click on the "Insert" button, which uses a plus symbol ( + ) for identification. A new station record is created and the cursor is positioned at the first item that needs to be filled out, as shown.
Step 2 – Enter Station Name

The initial text for the Station Name is merely suggesting you need to type something – in this case, a name that is used as a reference only for the station you are defining. You can enter up to 30 characters. Enter a name of your choosing and press the [Enter] key. The cursor advances to the next field (property).
Step 3 – Enter Call Letters

Enter the official call letters of the station – or a short slug identifier if preferred. The maximum length is 7 characters. The call letters are included with the Station Name (above) in lists of the stations for ease in selection. When you have filled in the information, press the [Enter] key. The cursor advances to the next field.
Step 4 – Enter Station Number

The Station Number is a 2-character value used in program log file names to identify logs for this station. You must enter 2 characters. A typical example is "S1" – if you’re unsure what is needed, check with the traffic person, program director or engineer who handles the station you’re defining for guidance on what is needed. When finished, pressed the [Enter] key. The cursor advances to the next field.
Step 5 – Create Voice Track Record Mask(s)
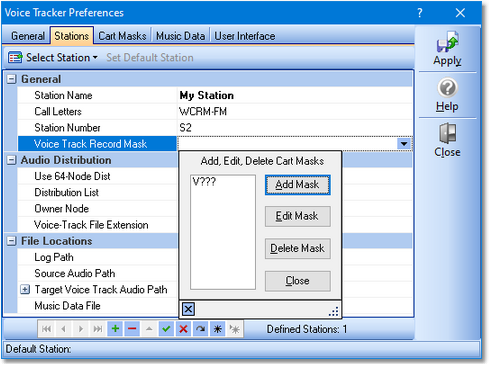
On entering this field, something different happens – a panel pops up, similar to the example shown.
This property is essentially a list of groupings, called cart masks, that identifies for XStudio Voice Tracker which cart numbers on a program log are voice-track carts that will be recorded.
|
It is important that this group of carts is properly identified, as only items on the log whose cart numbers match these settings can be recorded or modified. |
The Cart Mask Edit Panel (more info) is used as a convenience. Click on the [Add] button. You are prompted to enter a cart mask, which is double-checked when you confirm your mask entry. If the mask you entered is validated, it is added to the list of masks. For more detailed information on cart mask rules, see the Cart Masks Explained topic.
You can add as many masks as necessary to make sure all voice track cart numbers are included in this grouping. When you have finished, click on the [Close] button in the Cart Mask Edit Panel.
To move on to the next field, press the [Tab] key or use the mouse to select it.
Step 6 – Setting the Cart Distribution Model

The property (field) labeled "Use 64-Node Dist" is, by default, unchecked. This means that only 16 audio work stations (nodes) are eligible to receive voice-track carts created by XStudio Voice Tracker. If the broadcast facility where the station we are defining uses more than 16 audio work stations, check this item. When finished, press the [Enter] key to advance to the next field.
Step 7 – Selecting Station Distribution
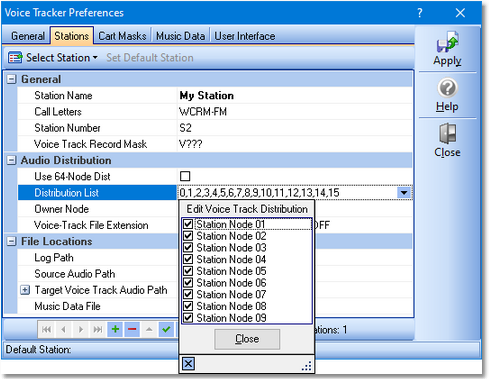
On entering this field, similar to the Voice Track Record Mask field, a pop-up panel is displayed, similar to the example shown.
The Edit Distribution Panel is used to make selecting the audio work stations in the facility that need to receive voice-track carts created for this station easier and more understandable. In short, check the stations that should be able to play voice-track carts created for this station. The list of stations can be customized for ease in identifying work stations – for more detailed information, see the Using the Edit Cart Distribution Panel topic.
Step 8 – Select the Owner Node

The Owner Node property (field) is used to identify the work station that "owns" the voice track cars created for the station. It is applicable for "distributed audio" systems – sites that do not have either a Maestro or DCS system with ACP (Audio Central Plus) or XStudio. The default value is zero (0) – if you have an ACP system or are using XStudio, you can leave this value at the default. To change the value, either enter the zero-based node number or use the spin controls adjacent to the field. The maximum value that can be entered is determined by the Use 64-Node Distribution flag – if checked, the maximum value is 63, if unchecked, the maximum value is 15.
Step 9 – Select the Voice Track File Extension

When a voice-track cart (audio file) for the defined station is created using XStudio Voice Tracker, the completed audio file’s extension is controlled by this setting. The default value is .DAF. However, if the audio delivery system at the defined station’s broadcast facility is an ACP system and you’ll be putting finished voice-track carts directly into the ACP audio folders, select the .DFF option.
Step 10 – Enter or Select the Log Path

This property (field) identifies the location of program log files for the defined station. You can either enter a path by typing or use the button adjacent to the field to select the path from a pop-up dialog.
Step 11 – Enter or Select the Source Audio Path

In order to play non-voice-track carts (audio files) on a program log, XStudio Voice Tracker must have access to the files. This property (field) is the location of these files, which are used for rehearsal of the finished voice-track cart and for auto-tracking. You can either enter a path by typing or use the button adjacent to the field to select the path from a pop-up dialog. If you are working remote from the station, it’s likely the music, jingles, commercials, etc. are located on your PC. If you are working within a station facility, more than likely the music files are located on a server. In either case, you must have at least file read privileges in the selected folder.
|
The XStudio Voice Tracker audio engine runs as a service application and as such, has no knowledge of any "mapped" drives – a drive letter assigned to a folder on a PC other than the one the audio engine is running on. Therefore, in order for the audio engine to be able to play or record files that are located on another PC, the paths to those folders must be entered using UNC notations. As an example, instead of using "P:\Audio" as the path, use the UNC notation: \\Remote_PC_Name\Share_Name\Audio in the path property field. |
Step 12 – Enter or Select the Target Voice Track Audio Path

Any voice-track carts (audio files) that you create using XStudio Voice Tracker are placed in the folder you specify in this field. This folder can be the same location as the Audio Source Path if desired – and normally would be if you’re using XStudio Voice Tracker within a broadcast facility. On the other hand, if you’re working remotely, it would be advisable (and probably desirable) to place the completed voice-track carts (audio files) in a different folder – mainly for ease in transferring them from your location to the station site. You can enter a path by typing or use the button adjacent to the field to select the path from a pop-up dialog.
Step 13 – Enter or Select a Voice Track Xfr Path (Optional)

This property is normally collapsed and not visible as it is an option associated with the Target Voice Track Audio Path. To make the field visible, click on the expand button [+] adjacent to the Target Voice Track Audio Path property. If a path is entered for this property, a copy of all newly-created voice-track carts is placed in the folder specified by this property. This folder location might be used as a gathering point for voice-track carts that are to be transferred to another location using a daemon or application that transfers files and deletes them after transfer. While the Target Voice Track Audio Path above could be used, if the external application that copies the voice-track files to another location also deletes them after copying, you would no longer be able to rehearse the finished voice-track cart once the external program finishes copying and deleting it.
Step 14 – Enter or Select a Music Data File (Optional)

The use of an imported music data file is optional. If one is used for the defined station, its fully-qualified file name is entered in this field. A button adjacent to the field can be used to display a file selection dialog. If this field is filled in, XStudio Voice Tracker will attempt to open the specified music data file when opening a log for the defined station. The information in the music data file is used to display song title and artist information on the log. For information on importing music database information for use with XStudio Voice Tracker, see the section on Importing Music Data.
|
If no music data file has been created (imported) for the station you are defining, you can leave it blank initially. After saving (posting) the station information, you can select the station from a drop-down menu on the Music Data tab. Since no music data file was defined for the station, XStudio Voice Tracker will prompt you, asking if you want to import a database file for the station. |
Step 15 – Post the Information

When all fields have been filled in, you let XStudio Voice Tracker know you’re done working with the station’s information by posting (committing) the data. Until edited station properties are posted, changes that have been made can be canceled without changing the original values (if any) of the station’s properties. Click on the [Post] button, one of the buttons in the data navigator near the bottom of the dialog. Posting edited records enables Preferences’ [Apply] button – visual indication your settings have changed. To make the changes permanent, click on the [Apply] button. Should you not apply the changes, you’ll be prompted to save them on exiting Preferences.


