|
Customizing the XStudio Voice Tracker Display Quick Links: General Appearance Toolbars Docked Panels Log Display |
Scroll Prev Top Next More |
The XStudio Voice Tracker main display can be customized in a number of ways to suit your needs, including the general appearance, layout of tool bars, location of information panels, log item colors, and log display column order, size and visibility.
General Appearance
You can modify the general appearance of XStudio Voice Tracker by selecting the menu item View | Appearance from the main menu, shown here.
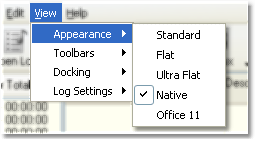
Select one of the styles to see the effect on the display. Here are some samples of the styles:

---- Native ----

---- Office 11 ----

---- Ultra Flat ----

---- Flat ----
XStudio Voice Tracker saves your selected style on exit and restores it the next time the application is run.
Working with Toolbars
XStudio Voice Tracker makes extensive use of toolbars on the main display. Any toolbar can be moved around by dragging it from its present position to any of the display edges. Where there’s an area the toolbar can be placed, it’s immediately put in position. Toolbars can also "float", as shown in this example:

Floating Toolbar
XStudio Voice Tracker automatically saves toolbar locations on exit and restores them the next time the application is run.
If you should "lose" a toolbar – meaning it’s no longer visible – or if you want to "get things back the way they were", you can use the menu item View | Toolbars from the main menu.

Toolbar visibility toggles
All toolbars that are checked in the sample menu are visible – unchecked items are not. To make a tool bar visible, select the toolbar item on the menu. You can also reset the toolbar layout to the application defaults using the provided menu items.
XStudio Voice Tracker saves your toolbar layout on exit and restores it the next time the application is run.
Working the Docked Panels
The XStudio Voice Tracker main display utilizes panels that can be moved around – or docked – on the display. Additionally, the panels can be "floated" on the display, as shown here.

Key Map "undocked" (floating)
Docked panels can also "auto-hide" – meaning that when the mouse moves away from the panel, the panel "hides", leaving just a tab displayed to save display face. This feature is useful when information contained in a panel is used only occasionally and does not have to be constantly visible. The auto-hide feature can be turned on or off by clicking on the [Auto-Hide] button on the panel, as shown.

Docking Auto-Hide
When a panel is hidden, float the mouse pointer over the tab label for the panel and the panel will open – move the mouse pointer off the panel and it will close.
Panels can also be combined – placed together – on the display. Drag a panel over another panel. An outline appears, indicating how the two panels will be combined. Possible combinations are side-by-side, top and bottom, and tabbed, which places the two panels together and displays a tab for each for selection.
If you have re-arranged the dock panels and want to restore them to the application defaults, select the menu item View | Docking | Restore Dock Settings to Application Defaults, as shown.

XStudio Voice Tracker saves your dock panel arrangement on exit and restores it the next time the application is run.
|
Some docking panels have unique features or specialized usage. See the topics Intro Countdown Timer and Station Info Panel for details. |

Customizing the Log Display
The log display can be customized in a number of ways. Item colors are controlled by the cart categories you defined in Preferences - Cart Masks. Column widths, column order, text font and font size, which columns are visible, and how spot times are displayed are all controlled from the main display.
Column Width. To modify a column’s width, float the mouse over the end of the column’s heading. A sizing icon will appear. [Left-Click] and hold the mouse down. Move the mouse left or right to decrease or increase the column’s size. Release the mouse button when finished sizing the column.

Adjusting log column width
Column Location. To move a column, [Left-Click] and hold the mouse down on the column’s title. Drag the column left or right to move it to a new position. The proposed new position is marked by an arrow. Release the mouse button to complete the column move.

Moving a log column
Column Visibility. Columns of information can be hidden or displayed, according to your preference. To add or remove columns from the log display, select the menu item View | Log Settings | Customize Columns. A dialog is displayed, containing the columns that are not currently displayed.

To add a column to the log display, drag the item you want displayed from the customization dialog to the position on the log’s title row where you want the column displayed. An arrow marks the position. Drop the column to complete adding it to the display.
To remove a column from the log display, drag the unwanted column from the title row of the log to the customization dialog and drop it.
Font and Font Size. You can change both the font type and font size for items displayed on the log. Only items on the log itself are affected, all other panels, menus, etc, are unchanged. To change the font type, locate the Log Properties toolbar – if it’s not visible, you can make it reappear using the View | Toolbars menu item (-more-). Click on the arrow adjacent to the font name to display a list of available font styles.

Font selection
Select the new font – the displayed log will updated with the new font style immediately.
To change the font size, use the spin edit control on the Log Properties toolbar. The control allows entry of only an acceptable range of font sizes.
|
To make the font size change, you must press the [Enter] key once the size you want is displayed in the control. |

Spot Time Display. The way audio items’ time is displayed on the log is controlled from the menu item View | Log Settings | Spot Times.

Selecting spot time display type
Selecting the None option suppresses the time display for all audio items on the log. Selecting the Log Time option displays the audio item times as are in the source log. Selecting the Estimated Air Times option (the default) displays audio items on the log at the time within the hour they are estimated to be played.
|
Estimated Air Times are calculated from the beginning of each hour. Audio items in some hours may have estimated play times that extend into the next hour – this is the result of over-scheduling an hour, a common practice for locally-automated stations. Estimated Air Times are calculated from the log length field. |