|
Preferences - Cart Masks / Cart Categories Quick Links: General Stations Music Data User Interface |
Scroll Prev Top Next More |
The Cart Masks tab in Preferences is used to define audio categories and to create color schemes (background and text) that are used in the log display. You can have as many categories as you wish with multiple cart masks in each category.
|
If you define duplicate cart masks for different categories, the cart number will be included in the first category the cart number matches. Categories are sorted alphabetically, by name. |

The example screen shot depicts a few of the commonly-defined cart categories. The example cart categories shown are included in the XStudio Voice Tracker installation and can be imported to get started quickly with some basic categories.

Hint: Float your mouse over the screen shot – where the mouse cursor changes to a hand-like appearance, [Left-Click] for information on the item.
Creating a new Cart Category
To create a new Cart Category, click on the insert button in the data navigator, marked with a " + " symbol – you can also used the [Insert] key.

A dialog appears, prompting you to enter a category name. The name can be anything you wish and is usually text that identifies (to you) what the category contents are.

After entering the name, click on the [OK] button. A second dialog appears, prompting for an initial cart mask. Enter the mask, which must be four (4) characters in length. For additional information on cart mask creation, see the Cart Masks Explained topic.

When you have entered the mask, click on the [OK] button. The newly-created category appears in the category list.
To set the category text and background colors, [Double-Click] on the color you wish to change. The field display changes to reveal a drop-down list button and a color dialog button.

You can use the drop-down button to display commonly-used colors. Selecting a color causes an immediate change in the sample text display, located above the category list. The sample text display provides an idea of what the current color combinations will look like on the log.
If the color you’d like to use is not in the drop-down list, click on the color dialog button to display a standard custom color selection dialog. For more information on using the custom color selection dialog, see the Using the Color Customization Dialog topic.
To add additional cart masks to the category, or to edit the existing cart mask, [Double-Click] on the mask field. When editing the cart mask(s) for a category, a panel is displayed for managing the masks.
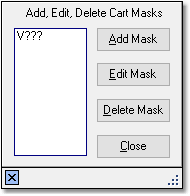
See the topic Using the Cart Mask Edit Panel for details on the panel’s usage.
When you finish editing the text color, background color and/or the cart masks, click on the [Post] button in the data navigator to save your changes.

Editing a Cart Category
To edit any one of the properties of a category, [Double-Click] on the item you wish to edit – you can also use the [F2] keystroke after selecting the item you wish to edit. When you have finished making changes, click on the [Post] button to save them.
Deleting a Cart Category

To delete a cart category, first select the category to be deleted. Either click on the delete button in the data navigator (show above) or press the [Delete] key. You will be prompted to confirm the deletion.
Exporting Cart Category Information
Cart category information can be exported to an external file if desired. All categories are exported, including the name, colors and cart masks. [Right-Click] on the cart category data table to display a pop-up menu. Select the menu item Export Cart Categories. You will be prompted for a file name for the exported information.
Importing Cart Category Information
You can import cart category information previously exported from XStudio Voice Tracker. [Right-Click] on the cart category data table to display a pop-up menu. Select the menu item Import Cart Categories and follow the prompts.
|
When importing cart category information, all categories currently displayed are replaced by the imported category information. |
