|
Preferences - Music Data Quick Links: General Stations Cart Masks User Interface |
Scroll Prev Top Next More |
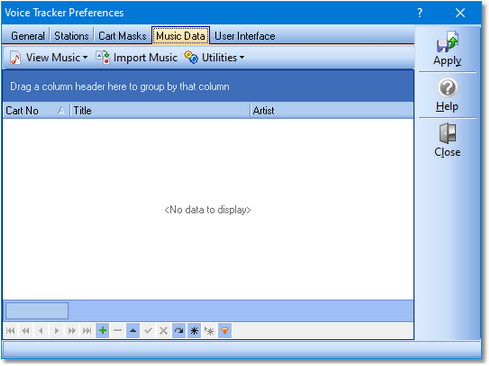
The Music Data tab in Preferences is used for displaying, importing and managing music databases. It is optional to use music database information with XStudio Voice Tracker, but if used, song title and artist information is displayed on the log when voice-tracking a station that has a music data file assigned to it.
|
To import your music database, you first need to export the music information from your music scheduling system. Supported music scheduling systems include Selector™, Music Master and POWERGOLD (others may be added in the future). If you are using Maestro and have already exported the music data for use within Maestro, you can use the same file. See the section on Exporting Data from your Music Scheduling System for more information on setting up and executing the export. |
Hint: Float your mouse over the screen shot – where the mouse cursor changes to a hand-like appearance, [Left-Click] for information on the item.
When the music data page is first accessed in Preferences, there is no music data displayed. Use the toolbar menu on this page to load and display music data, import a music database file, and to manage displayed data – add, edit, delete music records, along with bulk processing.

View Music (Open a Music Data File)
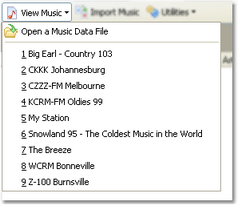
You can open existing music data files by clicking on the toolbar menu item [View Music]. A drop-down menu appears, listing all defined stations and a generic open file item.
To view a particular station’s music data file, select the station from the menu. If a music data file is assigned to the station, it will be loaded and displayed. If no music data file is assigned to the station, you’ll be asked if you want to import a music database and assign it to the station you selected – the import process is described in the topic Importing Music Database Information.
The displayed music data can be sorted and grouped, if desired. To sort, click on any of the columns. To reverse the sort order, click on the column a second time. Grouping by Artist is supported – click and hold the mouse button down on the Artist column heading, then drag it onto the group box immediately above the displayed data and release the mouse button.
Import Music
To import a music database, click on the [Import Music] toolbar menu item. For details on the import process, see the topic Importing Music Database Information.
Add, Edit, Delete Music Records Manually
Edit a record. Any of the displayed music records can be edited. Click on the item you wish to edit, then click again or press the [F2] key to begin editing. When you have finished editing, click on the [Post] button in the data navigator.
Add a record. To add a new music record, press the [Insert] key or click on the Insert button in the data navigator. When you have filled in the cart number, title and artist information, click on the [Post] button in the data navigator. The Misc field is optional and is used during import to timestamp when the record was added or updated.
Delete a record. Select the music record you wish to delete and press the [Delete] key or click on the Delete button in the data navigator. You will be prompted to confirm the deletion.
Bulk Processing Utility Functions

The menu toolbar’s Utilities menu item provides some utility functions for manipulating the music data. Many music directors have a habit of entering song information in their music scheduling system as all uppercase text. Others may be inconsistent in the way data is entered. Use the utilities to format the song title and artist fields either as proper-cased or all uppercase text.
|
If you inadvertently bulk process displayed data, you can discard the changes – either select another music data file to load or exit Preferences. You will be prompted to save the music data changes – click on [No] if you wish to discard the changes. |


