Cart Categories are used to define audio categories for filtering inventory lists and to create log color schemes (background and text) that are used in the log display. The initial display of the Cart Categories page shows a table of defined categories, if any, and a data navigator bar which can be used to add, edit and delete cart categories.
You can have as many categories as you wish with multiple cart masks in each category. There must be at least one cart mask for each defined cart category.
|
There is one special cart category name that must be created if you are playing music with XStudio and want to take advantage of all available features. The category "Music" is used (in addition to log color schemes and inventory filtering) as the category to which Music Fade is applied (if enabled). It is also used for special log display handling if you have the main menu View | Use Inventory Description on Logs feature enabled (checked). |
The example screen shot depicts a few of the commonly-defined cart categories. The example cart categories shown are included in the XStudio installation and can be imported to get started quickly with some basic categories.
XStudio Cart Category Usage
Cart categories are used in a number of ways in XStudio:
1.Log Display. When applied to a displayed log, any cart number that matches any one of the individual cart masks within a defined Cart Category will be displayed with the text and background color associated with the category. By using distinctive color combinations, you can more easily spot commercial clusters, for instance.
|
If you define duplicate cart masks for different categories, a log item's color scheme will be the text and background color of the first category the log item's cart number matches. Categories are sorted alphabetically by name. |
2.Inventory Display. When applied to an inventory list, any cart number that matches any one of the individual cart masks within a defined Cart Category will the included in the displayed inventory list. For instance, the sample display shows several categories, including one called "Commercials". You can see from the display that the cart mask associated with the Commercials definition is "T???". This filter definition means that, when selected, only carts beginning with the letter "T" will be displayed in the inventory list.
|
For purposes of displaying filtered inventory, duplicate cart masks in different cart categories do not affect filtering as you are selecting a specific filter and matching carts to that filter only. If you wish to use some complex filters for inventory display and want to avoid disrupting the log color scheme, make sure you name the inventory-only cart category in such a way that it appears alphabetically after all categories you have defined that are used for the log color scheme. You might, for instance, create a name like "ZZ My Category" to ensure that the category gets pushed to the end of the list. |
3.Automatic Music Fade. If this option is enabled, all audio items matching this category are automatically faded at Aux Mark. If you do not have a category named "Music" or your music content is part of another category, music fades will not occur.
4.Main menu View | Use Inventory Description on Logs feature enabled (checked). When this option is enabled, any log item matching the "Music" category is left alone - that is, the audio inventory description is not displayed in the log's Description field.
Cart Category Properties
Items with a check mark in the REQ column require user entry, while unchecked items have default values which can optionally be changed.
Property |
REQ |
Description |
|---|---|---|
Category Name |
|
The name by which you will identify a category. Category names should be unique to avoid ambiguity. |
Text Color |
|
Select a text color from the drop-down list or by using the color customization dialog. The default text color is Navy Blue. |
Background |
|
Select a background color from the drop-down list or by using the color customization dialog. The default color is either Gray or Tan, depending on the operating system you are using. |
Cart Masks |
|
At least one cart mask is required. See the Cart Masks Explained topic for information on valid cart masks and the topic Using the Cart Mask Edit Panel for details on how to edit cart masks for a category. |
Creating a New Cart Category
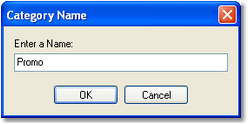
To create a new Cart Category, click on the insert button in the data navigator, marked with a " + " symbol - you can also used the [Insert] key. A dialog appears, prompting you to enter a category name. The name can be anything you wish and is usually text that identifies the category contents.

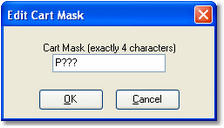
After entering the name, click on the [OK] button. A second dialog appears, prompting for an initial cart mask. Enter the mask, which must be four (4) characters in length. For additional information on cart mask creation, see the Cart Masks Explained topic.

When you have entered the mask, click on the [OK] button. The newly-created category appears in the category list.
To set the category text and background colors, [Double-Click] on the color you wish to change. The field display changes to reveal a drop-down list button and a color dialog button.

You can use the drop-down button to display commonly-used colors. Selecting a color causes an immediate change in the sample text display, located above the category list. The sample text display provides an idea of what the current color combinations will look like on the log.
If the color you’d like to use is not in the drop-down list, click on the color dialog button to display a standard custom color selection dialog. For more information on using the custom color selection dialog, see the Using the Color Customization Dialog topic.
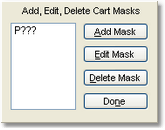
To add additional cart masks to the category, or to edit the existing cart mask, [Double-Click] on the mask field. When editing the cart mask(s) for a category, a panel is displayed for managing the masks.

Cart Mask Edit Panel
See the topic Using the Cart Mask Edit Panel for details on the panel’s usage and the Cart Masks Explained topic for information on valid cart masks.
When you finish editing the text color, background color and/or the cart masks, click on the [Post] button in the data navigator to save your changes.
Editing a Cart Category
To edit any one of the properties of a category, [Double-Click] on the item you wish to edit. You can also use the [F2] keystroke after selecting the item you wish to edit. When you have finished making changes, click on the [Post] button in the data navigator to save them.
Deleting a Cart Category
To delete a cart category, first select the category to be deleted. Either click on the delete button on the data navigator or press the [Delete] key. You will be prompted to confirm the deletion.
|
Deleting a cart category also deletes all cart masks associated with the category. If you didn't mean to delete the category, you must close the Preferences dialog and choose not to save the changes. When you reopen Preferences, the cart categories are restored to their last saved state. Be aware that not saving changes on exiting the Preferences dialog saves no changes you may have made while working in the Preferences dialog. |
Exporting Cart Category Information
Cart category information can be exported to an external file for backup purposes or to perhaps create a standard set of categories that might be used among several work stations. All categories are exported, including the name, colors and cart masks. [Right-Click] on the cart category data table to display a pop-up menu. Select the menu item Export Cart Categories. You will be prompted for a file name for the exported information.
Importing Cart Category Information
You can import cart category information previously exported from XStudio. [Right-Click] on the cart category data table to display a pop-up menu. Select the menu item Import Cart Categories and follow the prompts.
|
When importing cart categories and some categories already exist, you have the option to either add (append) the imported categories to the existing list or replace the existing categories with the imported categories. |


