A significant part of handling automated task performance is the need to respond to or control devices connected to the PC running XStudio. This topic covers creating, editing and configuring these resources.
In this topic |
|---|
|
Labeling resource audio channels and relays Attaching Actions to Relay Inputs |

External Resource Display
Adding a New Resource
To create a new resource, click on the [Add Resource] button. A dialog appears, allowing you to enter a user-friendly name for the new resource, select the resource type from a list of supported devices, and select the COM port to which the resource is connected on the host PC.

Selecting the Resource Type
Add Resource Properties
Items with a check mark in the REQ column require user entry, while unchecked items have default values which can optionally be changed.
Property |
REQ |
Description |
|---|---|---|
Resource Name |
|
The user-friendly name of the resource. Maximum length is 30 characters. |
Resource Type |
|
Select the resource type from the dropdown list. All supported resources are listed. |
COM Port |
|
Select the COM port to which the device is connected from the dropdown list. COM ports 1 through 8 are supported. |
Host Work Station |
|
Not used. For future expansion. |

When you have completed setting the properties for the new resource, click on the [Apply] button. The database record for this resource is created, along with a device map that displays available input channels, output channels, TTL Inputs, TTL Outputs, Digital Audio Inputs and Digital Audio Outputs, as applicable.
Resource Labeling
Each resource has some combination of audio input channels, audio output channels, relay inputs and relay outputs. Not all resources have all of these features, but all have at least some of them.
When a resource is first created, a default set of labels is applied to all items available in the resource as a starting point. For ease in identification as you are using the resource, it's a good idea to label them to better identify each item's purpose.
To edit a resource label, select the item you wish to edit, then either use the [F2] key or [Left-Click] to begin editing, as shown.

Editing Resource Labels
When you have completed the label edits, press the [Enter] key or select another label to edit. All label edits are automatically saved when you move to a new resource record or use the [Post] button on the resources data navigator.
Attaching Actions to Relay Inputs
If a selected resource has relay inputs, you can associate an Action with an input. When XStudio receives a message from the resource that the input relay has been triggered, XStudio executes the assigned action.
|
You must have created at least one Action in order to be able to assign an Action to a Relay Input. See the Actions topic for information on creating actions. |

To assign an Action to an input relay, [Right-Click] on the relay input label to display a pop-up context menu of options. Select the item Assign Action to Relay Input... A dialog appears, containing a dropdown list of all available Actions.

Assign Action to Input Relay Dialog
When you have selected the Action you want associated with the Input Relay, click on the [Apply] button to save your selection. The selected resource label will be updated to reflect the assignment.

Action Assigned to Relay Input
Actions assigned to input relays here are considered the "default" input relay mapping (the connection of an Action to an Input Relay). During XStudio program execution, these input relay connections can be overridden using the Remap Input Relays Task. The same task type can also be used to restore the default input relay mapping assigned here. This type of functionality is particularly useful when executed special programming like sports broadcasts or music specials delivered by a satellite programming service.
Remove (Clear) an Action from an Input Relay
To remove or "unhook" an Action from an Input Relay, [Right-Click] on the relay input label and select the menu item Clear Action from Relay Input ... The attached Action is cleared and Input Relay graphic changes to a red "X" to reflect that it no longer has an Action assigned to it.
Adjusting Input Relay Lock-Out Values
If a selected resource has input relays, you can "lock out" the relay for a specified period of time after it is initially triggered. The effect is to ignore any further trigger messages from the device until the "lock-out" time has elapsed. The idea is to prevent multiple Input Relay triggers, either as a result of erroneous multiple relay assertions by the device signaling the Input Relay or so-called "relay bounce." Adjusting relay lock-out values is also sometimes referred to as "setting relay de-bounce."
To adjust lock-out values, [Right-Click] anywhere on the resource map (the list of resource labels). A context menu appears, similar to the example shown.
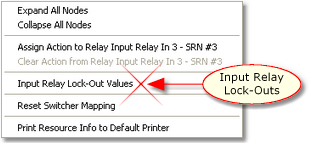
Select the Input Relay Lock-Out Values menu item to display the Modify Device Input Relay Lock-Out dialog. When edits are complete and applied, the dialog closes and resource record is updated.
Resource Usage
Several types of automation Tasks are resource-specific, such as tasks that update switcher channels, fade an audio channel on the switcher, or pulse a DOut (Relay Output). You can see which tasks are using a resource by selecting the resource and clicking on the [Resource Usage] button. All tasks are scanned to see which of them use the selected resource and when the scan is complete, a dialog is displayed containing a list of the tasks that use the resource you selected.
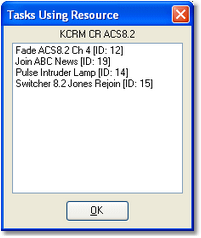
The displayed list includes the task name and its unique ID number. This list can be printed, if desired. [Right-Click] on the list of tasks and select the Print List to Default Printer menu item. See the Printing Lists topic for more information on printing.
Deleting a Resource
When you no longer need a resource, you can remove it from the database with the [Delete Resource] button. If the resource is used by any tasks, a message will appear, identifying how many tasks use the resource and asking you to confirm that the resource is to be deleted.
|
Deleting a resource is permanent and cannot be undone! It is highly recommended that before you delete a resource, you create a resource usage report so that you know which tasks, if any, will need to be modified or removed. |
Printing Resource Information
Resource information can be printed for reference, if desired. [Right-Click] on the resource map display and select the menu item Print Resource Info to Default Printer. The selected resource information will be printed, similar to the example shown. For more information on printing, see the Print Lists topic.

Sample Resource Report